Showing posts with label Card Sample. Show all posts

Wednesday, March 25, 2009

Convoluted Project

I titled this Convoluted Project because it is like a snow ball heading down hill. I signed up for this Coffee Card Swap nearly 6 months ago and in my fear that I will forget I keep double checking the calendar so I know when I need to get started on it. It is a card swap on the Cuttlebug Card Exchange Yahoo Group, so it has to have some kind of Cuttlebug'ease done to it.


Now I've been thinking about what I'd do for it and cut down a bunch of 5.5x4.25 panels and embossed them as you see here. Some are done in Chocolate and some in Vanilla Cream (both CTMH papers) I set them aside and decided to come back to it.


Time passed and then my new toy arrived (QuiKutz Silhouette) promptly named "My Big Baby" and I dinker'ed around with it for a week and found a hot coco cup complete with froth steam and a spoon. So it took me a few days to alter the cut to be as you see on the front of this card. It was a great opportunity to play with it and learn about altering pre-existing cuts.


Time passed and during that time I entered a blog candy opportunity to win some Card Scents from Scent My Cards. Lo' n' Behold I WON! - - I NEVER win anything. I decided to pick my favorite thing to smell which is Coffee. So this arrived yesterday and I have to say I LOVE, LOVE, LOVE the roller ball applicator...what a brilliant move that was. The smell is to die for and should be called "for the LOVE of Java". This morning around 8am I rolled on the back of the coffee cups (between the layers) one swipe of my "Scent My Cards" (only did 3 cards so far and have 8 total I can make) at 7pm when my hubby came home he walked in and said "mmmm, did you brew a pot of coffee at this hour?"

So now I have a card to go for the swap, a card to send to Cindy at Scent My Cards as a Thank You for the opportunity to win this YUMMY addition, Cards to add to my Stash Bash Challenge and a GREAT Smelling Craft room!

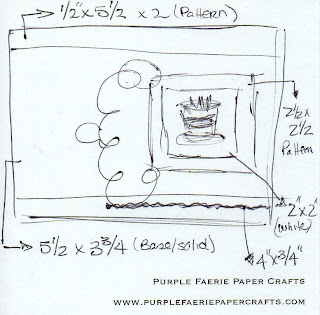
So this is the first Version of this card. I have a total of 8 cards and I'm doing 2 of each Version. I will share them with you and I get them done. This is mounted on a white card base with a 1/4" white border left all around. Here it just blends into the background. I used the Cuttlebug Embossing folder for the background. The Coffee Mug was not altered at all and is a die cut from my "Big Baby" The inside of the Mug is adapted from the froth cut for inside the cup of hot coco. There are no changes in the steam other than I adhered it facing the right because to the left it looked like a ? mark to me. I found a Scalloped circle cut that had 4 nesting's and I simply sized this one to fit exactly behind the mug to better distinguish between the background and the inside of the mug (see I did these separate from each other so they I didn't have the for site to make them different colors)

Tuesday, March 17, 2009

Stash Bash Cards n' Sheet Loads


Here are a few cards I made for Mother's Day. On both I used a Sheet Loads Sketch and the Spots n' Dots Cuttlebug Embossing Folder.

During the Stash Bash 3 Cards are equal to a 1 page Layout!

SheetLoad of Cards


Tuesday, December 23, 2008

Using the Kimono Dolls in Cards


These I simply placed on the pre-stitched panels (thank you Scrapbookplace) and added the Japanese characters at the bottom. Super simple but so elegant.

Thursday, August 14, 2008

More.....Multi Theme Card Swap Results

Just love this technique
Created by Betsy Hawkins

For me it was what you don't see. Stamped on the back of this card is "I kiss my dog on the lips" Now that just made me laugh...caught me totally off guard and tickled my funny bone!

Created by: Deb Hogan

I'm not a fuffy person but this card struck me as "SASSY" I love all the Cuttlebug Embossing Folder Techniques I'm seeing these days. Inspired me to purchase a few more. LOL...Inside of this card is stamped "When Life Gets Tough...go Shopping" how appropriate.

Created by Mindy Rapp

Well looky there...If it isn't our handsome frog dude...otherwise known as Da'Frog Mann. Oh how I love to see him used and enjoyed by someone else. This two step stamp is lots of fun.

Created by Renee Dudas

Thursday, August 7, 2008

Multi Theme Card Swap Result


Created by Betsy Hawkins
Just had to share this wonderfully interactive card as well. Love the stitching!!!

Tuesday, August 5, 2008

Purple Faerie Multi Theme Card Swap


This card was made by Kim
I think it is totally creative in that it is so interactive. You slide off the Bling part and reveal the writing area of the card. Very simple yet fun. Great job Kim!

Wednesday, June 18, 2008

Croppinsville Project: Little Yellow Bicycle Mom Frame


This project was done for the Croppinsville, U.S.A. Design Crew. It was a ton of fun to work with paper I would not have usually picked out to work with. Love getting outta my own box.


Here are the details on the AccuCut Flowers which will be available as a kit through the store. You can view the details on product used on each of these items by visiting the link set up in the post title.


Using the same papers but adding the fun chipboard embellishments, here is the Mother's Day Card.

Tuesday, June 17, 2008

A Class in Inchies


Purple Faeries Paper Crafts is going to Croppinsville

This class will be held June 28 at 11:00 am.
Cost for the Class is $15.00 and includes a Purple Faerie Stamp.

Product Used: Purple Faerie Paper Crafts - New Scroll Inchie, Paper Loft - Grandma's House Papers
Who's Teaching: Nina Perrin
What You Will Make: One 12x12 Scrapbook Page & One Standard Sized Card
What You Will Learn: How to make inchies and then to use them in projects as well as learning to make a stamp work for its retail value.

Where: Croppinsville, U.S.A. in Collinsville, OK

How Do I Register or get more information?: Email Croppinsville@att.net Subject: Inchie Class Registration

Come and see Purple Faeries Paper Crafts Stamp Collection.
We will also have many other projects and demonstrations throughout this amazing weekend.

Monday, June 2, 2008

Using inchies and sharing a card Sketch

This is a sketch created by Allie Gower for Croppinsville, U.S.A. It uses inchies in the layout so it makes it extra useful.

Here is the card I made using this sketch. This card uses my Technique Inchies for the Inchies-onexone web group swap, the Purple Faerie Sweet Memories Quilt Texture plate stamp, Navy with cream stitched gingham ribbon and the polished stone technique.

Friday, May 30, 2008

~~~ Inchie News ~~~


Just a note for all you Inchie Gals.


Make sure you are signed up for the Purple Faerie Newsletter. June is chocked full of Inchie information. This is information you don't want to miss!

Tuesday, May 20, 2008

Swapped Inchies used in a Card

Here are the Vintage Inchies from the swap

Here is a Card Beth Babcock made using some of those inchies.
Save this one as an awesome card sketch for using inchies.


Thursday, May 8, 2008

From Sketch to Card

I think it is interesting to see how different people will interpret the same sketch. Then add different product or even just different embellishments.


This sketch is from PageMaps - I love PageMap sketches but have yet to use one the size they indicate for the sketch. All this takes is a bit of measuring and some patients in figuring out what size will work for each element. I usually sketch it out myself with my dimensions and work from my re-worked sketch.


Page Map Original Sketch


My "crude" re-worked Sketch
Using Artistic Cake stamped image & Mini Rick Rack
Using a felt cupcake image and a rub-on

Tuesday, April 15, 2008

Tutorial - Paper Folding: Jacket Fold

Paper Folding
Jacket Fold

Someone mentioned I should rate these by skill level. I would say this fold along with the last folding tutorial would have to be set at a beginning tea fold technique.

Supplies Needed:
Four 2.5" squares of 2 sided paper (not cardstock)
Liquid Adhesive (such as Liquid Glass, Diamond Glaze or Delta's liquid Archival glue)
Bone Folder (not necessary but quite handy with the double folds)

The Folding


Step One

With the right side of the paper facing you (pattern), fold the top edge to the bottom edge.


Step Two
Fold the top layer of the left corner up to the top folded edge making a triangle of the pattern. Repeat with the right corner.


Step Three
Fold the center corner (bottom point of triangle) up to the long folded edge forming a smaller triangle.


Assembly

Step One
Hold the first piece vertically with the folded edge to the left. Place a dab of adhesive near the top right corner and slide the second piece horizontally with the folded edge to the top. You are creating a right angle with the two folded edges. Repeat this for piece number three.


Step Two
The last piece slides between the first and the third pieces so that one end is on top of piece three and the other is behind piece one's back flap and this creates a square.


Two final folded samples of the Jacket Fold


Standard size card Sketch using the Jacket Fold with an inchie insert.

Here is a card made using the above sketch and sample. I inserted an inchie I got from a friend of mine Rachele Funk from an inchie swap we participated in together.

Monday, April 7, 2008

Technique: Cracked Glass

Artwork by Nina Perrin

Technique: Cracked Glass

(Shared with me by Sundi Hendrix)


Supplies Needed:
Clear Embossing Powder (I recommend UTEE)
Versa Mark Stamp Pad
Cardstock
Stamp Set
Craft Heater
Refrigerator
Instructions:
Step One
Stamp the image you wish onto your cardstock
Step Two
Cover the entire piece of Cardstock with the Versa Mark Ink, Cover with UTEE and heat set
Step Three
Cover entire piece of cardstock with a second layer of Versa Mark Ink and UTEE and heat set until there are no dimples in the embossing powder.
Step Four
Place project into the refrigerator for 10 to 15 minutes
Step Five
Remove project from refrigerator and gently bend the cardstock. The UTEE will crack in the places you bend the paper.
Options
Ink the front of the cardstock with distressing ink to give it an antique look and show off the cracks more clearly.
Artwork by Dawn Neal

Artwork by Adeline Brill

Friday, March 21, 2008

Sketch Challenge WINNING Card is...


Created by Karyn
Stamping Stuff with Karyn

Your Winnings:
This is a blog candy worth $35+ In this bag of goodies are: (2) I Brake for Stamps background rubber unmounted stamps, (1) Close to my Heart Season Greetings Ribbon Round, (1) 1"x1" Acrylic Block, (1)pkg of 15 Rhinestone Flowers, (1) bag of Purple Faerie PC Mini Rhinestones, (1) Graduation Embellishment pack, (1) Purple Faerie PC Distressing Tool, Handful of Sample Cards in a variety of sizes, (1) pkg Purple Faerie PC Die Cut Pine Trees (3 trees), (1) craft jar of pink and cream sequins, (1) 6"x6" Chunk of background and texture paper, (1) box of 96 ProvoCraft Alphaletterz (Duty Free), (1) sheet of Handmade stickers in bright and bold colors and a 10 pack of 9 pocket PVC and ACID FREE ATC Pages (holds 90 cards)
Please contact me Karyn with your address and I will get this mailed off to you.
I'd like to thank everyone who submitted cards for this challenge. They were all beautifully done.

Monday, March 17, 2008

More Cards Back From Swaps

The next few cards I received back from the Stampers Corner Great in Green Card Swap and the Bella Card Swap. Thought I'd share them with you all for a little inspiration!

Created by Nina Perrin
Stamps by Purple Faerie Paper Crafts
Technique: Metal Alcohol Roll

Created by Nina Perrin
Stamps by Stamping Bella & Purple Faerie Paper Crafts


Created by Judy Miller

This card sports 6 layers of cardstock it is beautiful. The center flowers were embossed cut out and layered on with brads holding them in place. It is simply beautiful!


Created by Ann Creager
I love Bella and as usual this card is fun. Love the unusual shaped ribbon fastener (aka paper clip) Ann used on this card as well as the bright and bold color choices.


Created by Ann Creager

Again her is Ann demonstrating her unusual yet wonderful color combinations. I just love the bright boldness of this color combination as well as the texture combination. Hard to see in this scan but the green is a linen finish.

Created by Ann Owens
Stamps by The Angel Company (Ann is a rep for them) I believe the swirl paper she created using the chalk marbling technique. I will get confirmation on this from her. The contrast between the yellow and dark green is beautiful.

Created by Cindy Welch
Ok, I've decided I have to have this Bella...and this card sold me on this design. Cindy does an incredible job with texture in the linen finish pink cardstock, the laid finish of the blue cardstock combined with the cuttlebug embossing on the patterned paper. What movement!


Created by Stacy Pullins

I haven't found out where Stacy got these papers from and I'm trying to locate that information but the paper is stunning. Stacy has a wonderful sense of design and balance simple and elegant. Love this card.

Saturday, March 15, 2008

VOTE ~ Sketch Challenge ~ VOTE

CARD A
CARD B
Created by: Linda Weber
CARD C

Created by: Betsy Hawkins

CARD D

Created by: Rachele Funk

CARD E

Created by: Pam Volk

CARD F

Created by: Allie Gower


Please vote on your favorite submission by placing a comment with one card Letter selected! You have until Thursday, March 20th to vote. Votes will be tabulated through the web-group and the comments left here and the winner will be announced on Friday, March 21st (Good Friday)