Showing posts with label embellishments. Show all posts

Wednesday, June 18, 2008

Croppinsville Project: Little Yellow Bicycle Mom Frame


This project was done for the Croppinsville, U.S.A. Design Crew. It was a ton of fun to work with paper I would not have usually picked out to work with. Love getting outta my own box.


Here are the details on the AccuCut Flowers which will be available as a kit through the store. You can view the details on product used on each of these items by visiting the link set up in the post title.


Using the same papers but adding the fun chipboard embellishments, here is the Mother's Day Card.

Saturday, March 8, 2008

Tutorial - Paper Beads

Tutorial - Making Paper Beads

Supply List
  1. Tool to wind beads on (I use dowels - in the pic you see a flower pot of dowels that a friend of mine made for me to wind wire around in different sizes)
  2. Mod Podge
  3. Paper
  4. Paper Cutter
  5. Ruler
  6. Craft Knife
  7. Chap Stick
  8. Cutting Mat

Step One

Choose your paper, some contrast is good. Cut your paper into 1/2" strips and then cut them into 3" or 4" lengths. I suggest 3" lengths until you have cutting and rolling down pat.

Step Two
Lay your first strip down on a cutting mat. I like to use one that has measurements on it so I can better estimate the center point. Using your ruler give yourself a cutting guide to cut diagonally from midpoint to the right side corner.

Cutting Progression
Do this again to the other side so you end up with long triangular pieces. Save your small cut off pieces for small beads.

After you have cut on the diagonal: both sides.

Step Three
The dowel I'm using is 1/8" in diameter. This is a great size to string even ribbon through your bead. I've used a piercing tool but it makes it very hard to string anything thicker than thread quiet challenging. A Chop Stick works well too. Using Chap stick coat the outside of whatever tool you are using to mount your bead onto. This enables you to remove the bead eventually off of the tool.

Step Four
Place a tablespoon or so of Mod Podge into a disposable cup. I like to use the cups from the Crystal Light 2qt size servings. I was them out and save them to work with in my craft room. Dip your first piece into the Mod Podge. I press my first two fingers together and pull the paper through to remove much of the Mod Podge before I begin to roll the bead.

Step Five
Starting with the 1/2" end of your strip begin to navigate it around the dowel. This is the part that takes some practice to manipulate the strip around the dowel and keeping the strip moist with Mod Podge. Once it is rolled and even I like to tap with a finger some extra Mod Podge onto the outside to seal the bead. Your fingers will get quite coated with Mod Podge so you can use a brush if you'd like. Push the bead up to the top of your dowel giving you room to make your next bead.

Dowel with multiple beads drying over a dish.

These are beads made with the scrap pieces of paper (green smaller beads) and beads made with 4" lengths (chunky beads)


If you don't taper the sides of your paper and simply roll a bead without cutting the strip you will end up with a very plane bead with no change in color or pattern.

Here you can see the change in color and patter due to the tapering of the strip of paper.
Here you can see the hole in the bead. Nice and large which is so much easier to use on your projects.
Final Cup of Paper Beads

Bead strung on Waxy Flax, Gingham Ribbon, Yarn and smaller decorative ribbon.

Saturday, January 19, 2008

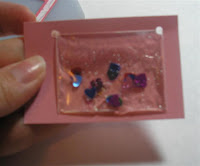
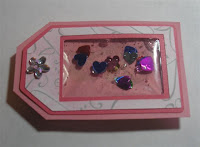
Tutorial - Gel Squishy Tag Element

or this isn't your grandmothers shaker card

Well how do you name a tutorial like this one? Essentially you’re making a shaker element for a card but instead of shaking it you would be squishing it.

Supplies:


Cricut or other tag template where you can have an open center
Styling Hair Gel
Plastic card Confetti aka sparkly confetti
Mini zipper top baggies
Liquid glass or other liquid glue and tape adhesive
Pop Dots or 3D Strips
Craft Knife & Paper Scissors
Crop-a-dile or Hole Punch
Cardstock


Step One:
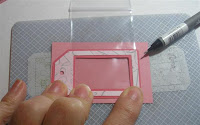
Using your Cricut or other tag template system create a tag with a window that matches the width of your zipper top baggie. (ie in the sample I’ve shown I am using the Cricut Doodle Type cartridge’s in shadow at 2.5” and then the upper layer in without the shadow still at 2.5”) Cut as many as you will need for your finished product. If you did make a overlay piece you will need to adhere this overlay (light pink in photo) to the tag making sure that the holes of the tag match up as well as the window.
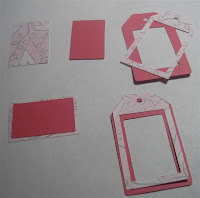


What is nice you will have all these inside pieces to use on this project or on another project already cut out for you.


Step Two:


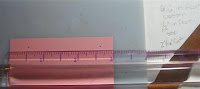
Now you will cut out a piece of cardstock slightly larger than your tag window. This I am calling my Tag Mount. In the sample I’ve shown my Tag Mount size is 3”x2”. Now measuring your tag with the zipper top baggie between it and the Tag Mount find the size just inside the window of the tag. This is going to be your zipper top baggie mounting mouth. Using your craft knife carefully make a cut for this mouth.
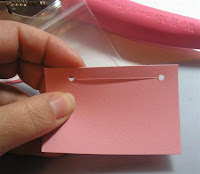
Using your crop-a-dile make a hole at each end (double check you don’t go outside the tag measurement so it does not show from the front). This hole helps the sides of the cardstock from ripping when the gel element is being squished.
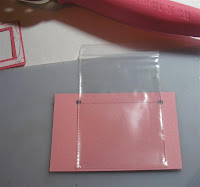


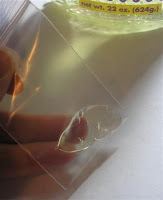
In this image you can see how the holes you made are still very tight to the edge of the zipper top baggie.


Step Three:


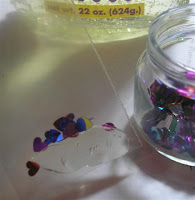
Now the fun part starts. Open your zipper top baggie and drop two glop’s of the hair gel into the bottom of the baggie (try not to get any onto the upper edges or sides of the baggie) These glop’s only need to be the size of a dime each. You will then add a pinch or two of your plastic card confetti into the baggie. Gently mix keeping the mixture to the bottom of the baggie. Press out all air and zip the seal shut. Get all the mixture to the very bottom of the baggie.
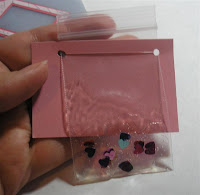
Step Four:

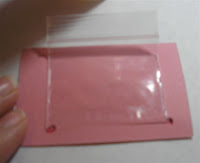
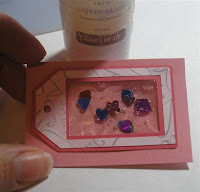
Feed the zipper top baggie through the tag mounts slit. You need to position it so that it is hidden completely by the tag itself when placed on top of the baggie. Once the positioning is adjusted using your liquid Glass add a few dabs under the baggie to adhere it to the Tag Mount. The nice thing about using clear liquid glue is that you can not see it through the window and baggie contents. Turn the tag mount over and press the flap of the baggie that does not have any gel in it to the back side of the mount and adhere similar to doing the front side. There will be the zip part of the bag extending over the tag mount’s back side. We will deal with this in a bit.


Step Five:

Now it is time to trim the tag mount down to just larger than your actual tag. The tag mount now only looks like a matted background piece to your tag gel window. Make sure you do not cut the zipper top baggies zip top portion that is left loose. Now turn over the whole structure. Fold the loose portion of the baggie into the center of the tag, using your clear liquid glue apply a small amount under the flap and glue it back onto itself. Use your pop dots or 3D strips just along the edge of the baggie for final mounting as well as to help hold the edge of the zipper top baggie to the mount.
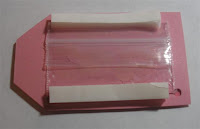


Now you can use your gel tag element on any project.
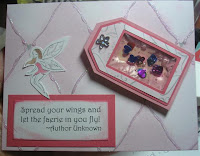
Product I used was:

Background & Texture Paper: The Paper Studio
Cardstock: Close To My Heart
Liquid Glass: Close To My Heart
Flower Jewel: Close To My Heart
Quote Stamp: Purple Faerie Paper Crafts
Faerie B Stamp: Purple Faerie Paper Crafts
Sparkly Glitter Glue: Purple Faerie Paper Crafts

Friday, January 18, 2008

Texture Mania on a Dime

Do you love working with your texture plates? Do you want more texture but don't want to purchase more plates? Well you don't have to.

This will drive your husband nutz, we'll just call this the bonus plan !

Try snooping around his work area...yes, go open the drawers and look through what he has hidden out there. If you don't have a husband but have an adult male that likes to work with tools that works too. Or you can even take a tour through your local hardware store. Find yourself a nice young man to assist you who knows you can play dumb and sometimes they will let you walk out with nice samples...because you just have to check with your husband and make sure it's the right stuff...and since you are there swing by the flooring department and pick yourself up some of those flooring samples. We'll discuss those at a later date!

Now the fun part. See what you can find. Nearly everything out there has a purpose in YOUR craft room/space/haven/abode!

You would not believe what I've taken over from my husband...and I'm not even talkin' texture here...but that is another Vendor tip day

Here are some ideas on what you will find:
Wire mesh * Netting * Patching Plates * Tile * Sandpaper (of all kinds) * Chicken wire * Trowels with dried on Spackle (cause they didn't clean it and then couldn't bare to throw it away) * Silver HVAC tape * and so much more!

and yes, all of these items will give you some of the most fantastic textures...and some of them can go through your texture machines. (BE CAREFUL though)
This is a roll of sticky mesh fabric. I actually applied it to a project once
This yellow stuff is Fiberglass patch material. A whole roll disappeared out of my husbands workshop. I love to use it with acrylic paints.

Saturday, January 5, 2008

Tutorial ~ Ribbon Folding: Box Fold

Tying ribbon is a tricky and pain staking thing to accomplish. I've spent years practicing and I can only claim to say they don't look "too bad" however, what I have learned to do is to fake it. I have ton's of ways to get the real look of many types of tied ribbons, but doing it in a way that makes it easier as well as having better results.

This ribbon fold is so simple and results in a wonderful look


I call this my Box Fold Ribbon. It is incredibly versatile as you can change out the front element and get a huge variety of looks.


Step One: Begin with a 4" piece of ribbon (any type) Here I used a piece of organdy. Fold it in half holding the two raw ends up and letting the folded loop fall to the bottom.


Step Two: Fold the two raw ends toward you about 1/4" in depth about 2x.


Step Three: This is the trickiest part of this faux ribbon fold. Using two hands makes it much easier to do. Holding the folded raw ends in one hand use the other to bring the loop end up and split in half. You will be opening it up onto itself and then folding the top down onto the split.


*Note: Do not let go of the folded raw ends, you will loose the whole fold.


Step Four: Poke a brad, eyelet or other embellishment through the ribbon centered in the raw edge fold section. This will hold the whole thing together.


Now your Box Folded Ribbon is ready for adhearing to any project.

Sunday, November 25, 2007

Paper Candy Assortments

I've been spending a lot of time getting the website developed so it can be up and functional by the first quarter of 2008. Although it is very creative work...it is time consuming and I needed to get in some "Paper" Creative work.

So with the opportunity for playing, I did the following Valentines day Paper Candy. Also you will see in this image the new product toppers I designed for the Paper Candy that will be for sale on my website.

This Paper Candy comes with 8 elements as seen here.

* Tag with popped Love and glitter heart
* Red heart with XO in Liquid Glass and popped
* Die cut word Love with words stamped on L and V
* Ribbon with Brad
* Phrase frame with heart eyelets
* Paper Flower
* 3-D glass Cupid face
* Eyelet/Waxyflax corner element pocket


I wanted to share some awesome Paper Candy packets that I got in a Swap. I think these are awesome.

This first packet was created by Sherry Staley:


This second packet was created by our very own Susan Culotti:


Stinking cute is all I can say!

Monday, November 5, 2007

Blog Swap Anyone?

Ok this is a very different kind of swap. I belong to a yahoo webgroup called Stampers Corner. You can subscribe by emailing your interest to: StampersCorner-subscribe@yahoogroups.com


It is an awesome webgroup full of information. On this group I've met a woman who does these things called "Inchies". You will have to check out her blog called Debbie's Die Cuts. Go check it out and then read on about the swap.

<~~~Inchie Swap~~~>

Make 10 Inchies

Size - 1"x1" of course

Receive 10 Inchies back


Now just email me at nina@purplefaeriepc.com if you are interested in playing. If we get 9 more people interested it is a go. Once we get our 10 total people I'll email all the players with dates details etc.


Now here is my sample, however the scan does not do it justice. I used a black 1"x1" sq took white cardstock and did the Cuttlebug Smoosh. I then painted it with acrylic paint with a bit of re-inker added. I cut that down to 3/4"x3/4" and adheared it to the black cardstock. I then used a sticker on top of that.


Now, this one is very SIMPLE but if you haven't checked out Debbies little Bitties you have to see what she has done! These are awesome!


Now you may ask...."What do I do with these?" Don't blush, I thought the same thing...but then my mind started swirling and I thought of a ton of applications. ATC cards, embellishments to scrapbook pages. Paper Candy City!


Fun Fun Fun Fun

Tuesday, October 30, 2007

Tutorial ~ Make Your Own Rub Ons

Sometimes it is difficult to find the perfect Rub On! Sometime it is 10:00 at night and all the stores are closed and you have to have a Rub On. What do you do?

Why make your own of course

Supplies Needed:


  1. Transparency paper - I use the Transparency film for ink jets. (Do Not Spend $50 for 5 sheets)

  2. Ink Jet Printer

  3. Popsicle Stick or other burnisher type item (a bone folder works good too)

Step One

Decide what you want to make into a transparency. Open your word processing program (such as Microsoft Word or Word Perfect) and create a new document with the items you want to make into rub on's on it. Fill the 8.5x11 sheet up leaving about 1 to 1.5"'s between each image or word.

Step Two
Load your transparency film into your printer so that it will print onto the smooth side of the film.

Step Three

Format your printer settings by selecting print properties. Once there select the "Best Quality", "Mirror" or sometimes called "Word Flip" (doing this flips your words and images so they are facing the direction you need once they are rubbed on) Once this is all done select print.

Step Four

Set it aside and DO NOT TOUCH IT as it will smudge


Step Five

Once dry place the transparency face down (ink side down) and using your Popsicles stick or bone folder rub firmly until the image has been transferred.


Note: once you have used up all the rub on's off this transparency sheet don't throw it away. Recycle it (they can be expensive to keep buying them so by all means reuse) just clean off the sheet with a damp paper towel, let dry and it is ready to re-use.

This is the transparency sheet I made

This is my name, upper left corner rubbed onto my white cardstock.